Concrete Slump Test as per Latest IS Code 1199 – 2018 (Part-2)
In today’s article, we will understand that, according to the latest IS code 1199–2018 Part-2, how to do Slump Cone Test properly. Many readers already know about this test. But some things have changed in the new amendment, which you have to understand from interview point of view. That’s why today’s video is very important.
In today’s video, we will know, why we do slump test? When can’t we do it? What are the things we have to keep in mind before doing this? What is its proper procedure as per IS code? How to check its result? And how to know, whether the result of Slump Test is valid or not? Today I will tell you all this, as per latest IS code 1199-2018, that too in very easy language. For reference, I have also given the pdf link of IS 1199–2018 Part-2. You can download it. First see it, understand it and then download it.
First of all, understand that, why we do Slump Test. With the help of this test, we get the consistency of concrete. If understood in simple language, with the help of this test, we check whether our concrete is workable or not, according to different conditions. So that inside the concrete, the consistency remains till it is easily placed at site. That’s why it is also called Worability test.
With slump test, We can get the consistency of Concrete. Apart from that, there are 5 different tests, by which we can get the consistency of concrete. Like, Vee Bee test, Compacting factor test, Degree of compactibility test, Flow table test, and lastly, Slump flow test. We use this test to make high fluidity concrete.
So in my upcoming article, I am going to cover all the test as per IS code. Today we will know about Slump Test. Before starting slump test, we should know that, when and in what condition we cannot do this test. Because this question is also asked many times in the interview. So read carefully.
For Foam Concrete, Slump test is not preferable. Also, concrete in which Fines are not used, they are not used for that too. And the concrete in which, the maximum size of aggregate is being used more than 40 mm, this test is also not preferred as per IS Code 1199 – 2018.
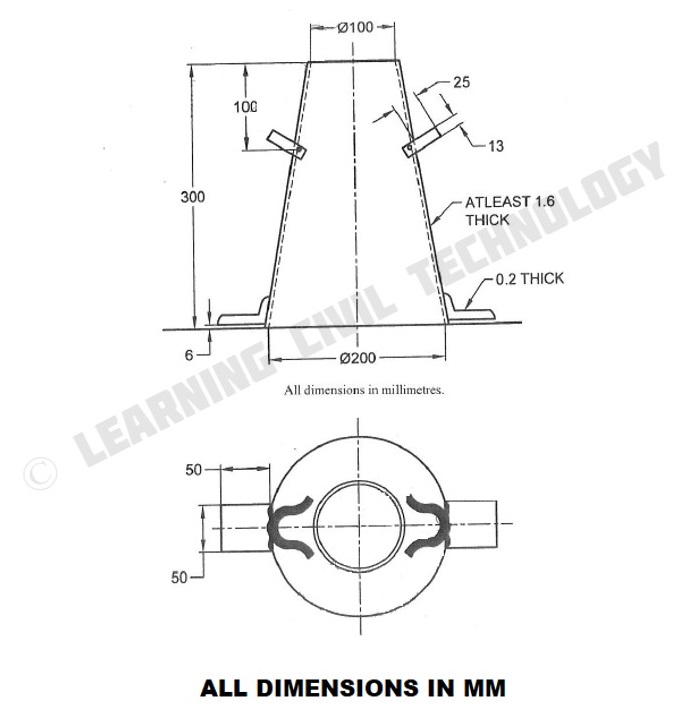
Now first of all, let us know that, to do this test, what apparatus is needed. The first is Mould. Technically this type of mould is called Hollow Frustum. Which should be of metal and its thickness should be 1.6 mm. The part inside this mould should be smooth. Talking about its internal dimension, the diameter of its base should be 200 mm, diameter of top opening should be 100 mm and height should be 300 mm. In the interview, a question is asked from here that. How much tolerance is allowed in this dimension. So the answer is (+/- 2) mm. Means suppose, height should be 300 mm in actual, but yours is 2 mm more, that is 302 mm, or 2 mm less, that is 298 mm, then according to IS code it will work. You will see this in clause 4.3.2.1 of IS code 1199 – 2018 Part-2.
Next apparatus is tamping rod. With the help of which we will compact the concrete. Its cross section should be circular and its diameter should be 16 mm. The tolerance for its diameter is, as per IS code, (+/- 1) mm. Talking about its length, it should be of 600 mm. And the tolerance for its length is, as per IS code, (+/- 5) mm. You get the reference of both these tolerances, in clause 4.3.2.2 of IS 1199 – 2018. If you want, you can make it bigger, by putting a plastic conduit in the upper part of this tamping rod, but keep in mind that, the total length should not exceed more than 1 meter.
After that, Scale is needed to measure the slump value. Need a Rigid, Non absorbent plate with flat base. After that, a Shovel, a Concrete mixing tray which should be flat base and non absorbent. Along with this, there should also be a scoop and a stop watch.
Generally, the casting which is done at the site, we check the value of slump test by taking the concrete sample from the same. But if you want to know how to calculate the concrete volume of slump cone mould, then I have made a dedicated video on it. Do watch it once. And from where does the formula came, I have also made a dedicated video on its derivation. You will find the links of both the videos below. Questions are definitely asked from here in the interview. That’s why must watch.
First of all, you have to wipe Mould, Base plate, and mixing tray thoroughly. Keep in mind that there should not be any water etc. anywhere. Means that it should not be wet. Keep this in mind. Along with this, where the base plate and mold are kept, they should be vibration and shock free. so that it does not move.
STEP: 2
After that, start putting the concrete sample inside the mould and start tamping it with a tamping rod. Remember, you have to pour concrete in total 3 layers. That is, every layer will be of 100 mm. You will find this in clause 4.3.3 (b) of IS code 1199 -2018 Part-2. And each layer has to be tamped 25 times. You will find its reference in clause 4.3.3 (d) of IS code 1199 -2018.
From here, you are asked this question in the interview that, in how many layers the concrete is filled during the slump test? Many people answer this with 4 layers. But, it was in the old IS Code. According to the new IS code, now concrete has to be filled in 3 layers. I have also made a dedicated video on this, and compared Old IS code and New IS code and have also shown it by taking it to IS code. The link of the video will be found in the description of this video.
So you have to fill concrete in 3 layers, and tamping each layer 25 times. Tamping has to be done in such a way that your tamping rod can go to the next layer. That is, if you are tamping the 2nd layer, then the tamping rod should go in the first layer. Similarly, when tamping the 3rd layer, the tamping rod should go to the 2nd layer.
STEP: 3
In this way, after compacting the concrete well, the mold has to be filled up, till the top. After properly filling the top layer, the tamping rod has to be rolled over it. So that whatever extra concrete sample is removed from the top, it becomes a plane and uniform layer.
STEP: 4
Now you have to raise the mould vertically by holding both the handles provided in the mould. Remember, you do not have to apply any lateral or torsional force, that is, neither do you have to apply any horizontal force nor do you have to lift the mold by rotating it. Pull vertically upwards. And while doing this pull, you have to keep the stop watch on.
You have to complete this pull in 3 to 7 seconds. Actual time to pull is as per IS code, 5 seconds. Tolerance is (+/- 2) second. Along with this, you also have to keep in mind that, from concrete sample placing in Mould, to mould lifting, this process has to be completed within 180 seconds as per IS code. For reference, you can see clause number 4.3.3 (m) of IS 1199-2018.
STEP: 5
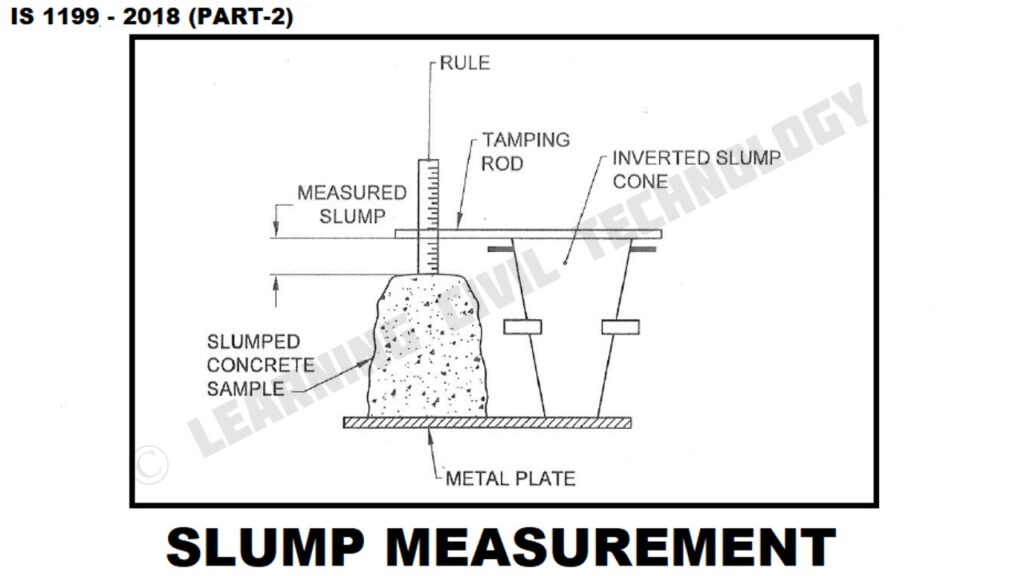
As soon as you lift the mould by vertical pull, you have to quickly check the slump value with the help of scale. Your slump value will be the measurement from the top of the mould to the top of the concrete. Its standard unit of measurement is mm.
STEP: 6
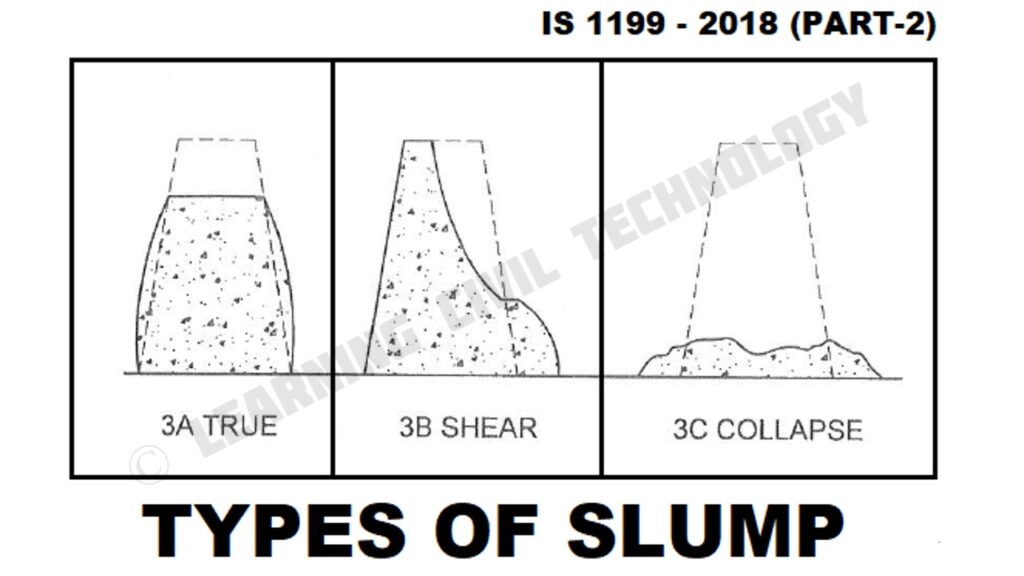
Now you have to check, whether we will consider your slump value which has come out or not. So you see this picture here. When you are doing slump test on the site, then you can get to see its result in some way. We will consider the result valid only when your result will be like True slump. Which you are seeing in 3A. If the shape of your sample is like 3B or 3C, that is, it looks like shear or has collapsed, then this result will not be valid and you will have to perform the test again.
So friends, this was the complete detailed explanation of slump test as per Latest IS code 1199-2018 Part-2. I hope you have understood everything in detail.
And those who want PDF of IS code 1199-2018 part-2, can download it by clicking on the link given below.
If You Want Detailed Knowledge Then Watch My Video On YouTube Channel: Learning Civil Technology. I Am Telling This Because Many Important Points I Have Covered During Making Of Video, So If You Want To Know In Detail Then Watch My Video On YouTube Which is Given Below.
You can also follow me on Instagram, Telegram and Facebook page. Because many small things, which are very important from interview point of view, it is not possible to put here, I put all that on Instagram, Telegram and Facebook page. You can take it from there. You will find the links of all social media below.


 – Benefits, Applications, PPT")

