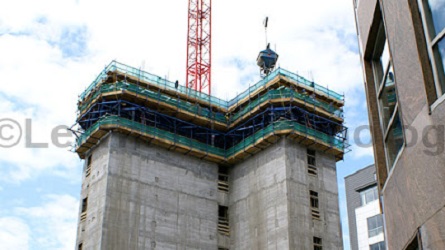
In this post, we will learn about the Assembling Procedure of Straight Slipform at site practically.
Assembling Procedure of Straight Slipform
1. Position the vertical and horizontal reinforcement with the correct cover.
2. The casting of the starter. (min : 150 – 200 mm)
3. Check starter for the correctness in level and diameter.
4. Fix the inside and outside staging brackets/erect scaffold pipes, if required.
5. Fix timber runners connecting the walkway brackets. / Level the surface using cement mortar.
6. Check the level.
7. Tie the vertical and horizontal reinforcement up to shutter top height.
8. Mark the position of inside and outside yokes in the starter, starting from the tower location.
9. Ensure that three sets of yokes are located in between two tower verticals.
10. Align the panels and introduce steel washers at regular intervals to maintain4mm slope both inner & outer faces.
- STACKING AND STORAGE OF MATERIALS
- Design and Construction Of Pile Foundations
- Evolution of Retaining Structures
- Glossary Relating To Bitumen And Tar
- Aluminium Formwork Refurbishment
- Safety For Hydraulic Tensioning Jacks
- Methodology of Post Tensioning Work
- Properties of Prestressing HT Strand
- Losses in Pre Stress due to Elastic Shortening
- Jack Pressure for Single and Multi Pull Stressing
- Elongation & Modified Elongation in Prestressing
- Prestressing Materials Management at Site
- Prestressing : Definitions | Advantage | Application
- Slipform – Slipform Planning at Site
- Labour Productivity Norms in Slipform
- Dismantling Procedure of Slipform
- Slipform Reinforcement Schedule Planning
- Assembly of Stair Tower for Slipform
- Assembling Procedure of Tapering Slipform
- Assembling Procedure of Straight Slipform
- Classification Of Slip Form Work
- Design Considerations of SlipForm
- Evolution of Slip Form Now a Days
- Measure Horizontal Distance Using AutoLevel
- Bulking OF Fine Aggregates
- Concrete Cube Samples Taken for Different Volume
- Grades of Concrete as per IS 456 : 2000
- Flowchart For Aluform Work At Site
- Dismantling Process of Aluminium Formwork
- Assembling Process of Aluminium Formwork
- Dismantling Of Slab Aluminium Formwork
- Dismantling Of Wall Column & Beam Formwork
- Aluminium Formwork Concreting Process
- Assembling of Wall Aluminium Formworks
- Assembly Process of Aluminium Formwork
- Aluminium Formwork Worksite Management
- What is 1.54 in Concrete
- De Shuttering Period as per IS 456
- Grade Of Concrete And Its Cement, Sand And Aggregate Ratio
- Derivation Of (d²/162) – Unit Weight Of Bar
- Volume Of Different Shapes
11. Fix top and bottom waler pipe. Fix external supports, both horizontal and inclined to align the shutter.
12. Fix filler panels.
13. Repeat the operation 10 to 12 for outside and make sure that washers are introduced at the bottom of shutters to achieve 4mm slope towards inside.
14. Fix the waler shoes, inside and outside yoke legs. Adjust waler shoe and check the verticality on both faces.
15. Keep timber supports between top & bottom walers at yoke location.
16. Align the form panel by external supports.
17. Fix the yoke beam generally two numbers at the bottom and one number at the top.
18. Check the level of yoke beams with spirit levels.
19. Fix the inside and outside walkway brackets.
20. Finish the final alignment by suitably adjusting the waler shoe bolts. Ensure that all walers are touching the form panels. Provide packing wherever required.
21. Fix the flying tie rod assembly and support the centre rings. Ensure uniform tightness is maintained in all the spokes.
I hope you find this information useful. If there is something that I have missed or I do not know, you can comment and tell me which I will try to rectify as soon as possible.
If you have liked this post of mine, then use the social link given below and share it among your friends on social media. Thanks
SHARE THIS POST, IF YOU LIKE IT !!
Padhega India Tab Hi Badhega India | पढ़ेगा इंडिया तब ही बढ़ेगा इंडिया


