
Hello Friends, This is Mukesh from Learning Technology. I will tell you in today’s post, How to determine Flash and Fire Points of Bituminous Materials in a very easy way.
Object of Experiment
To determine Flash Point and Fire Point of the Bituminous Material
Theory and Scope
At high temperatures, bituminous materials emit hydrocarbon vapours which are susceptible to catch fire and may create hazardous conditions. For safety reasons, it is, therefore, essential to qualify or restrict the heating temperature of bituminous material for each grade. IS: 1209 – 1978 has defined the Flashpoint as the temperature at which the vapour of bitumen momentarily catches fire in the form of flash under specified test conditions.
Whereas, the Fire point is defined as the lowest temperature at which the application of test flame causes the bituminous material to ignite and burns at least for 5 seconds under specified test conditions. Flashpoint and Fire point tests used to determine the temperature to which bituminous material can safely be heated.
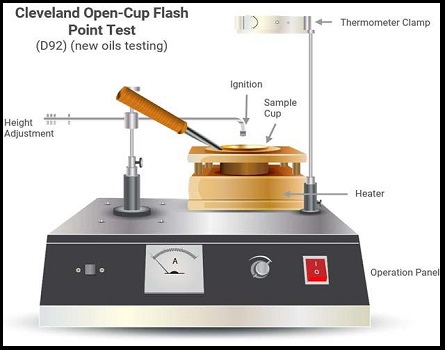
Flash and Fire point can be determined by Cleveland open cup tester conforming to IS 1209 – 1972 for petroleum products and other liquids. It is not used for fuel oils and the material having flashpoints above 79 degrees Celsius.
Equipment
Cleveland open cup apparatus
Shield
Low and high range thermometer
READ MORE
- Determination of Flakiness and Elongation Index of Coarse Aggregates
- Stripping Value of Road Aggregate by Dynamic Immersion Method
- Determination of Efficiency of a Centrifugal Pump
- Calibration of V-Notch Experiment
- Aggregate Impact Value Test as per IS 2386 (Part-IV) 1993
Description of Equipment
Cleveland open cup apparatus has the following major components:-
(a) Brass test cup internal diameter of 63 – 64 mm and height of 32.5 to 34.0 mm. A filling mark is engraved at a distance of 9-10 mm below to surface. It also has a circular plate on the outside near top. The cup is provided with a wooden handle.
(b) A brass or cast iron or steel heating plate with a 69.5 to 70.5 mm diameter center hole. A sheet of hard asbestos board covers the metal plate except over the hole. The central hole allows the mounting of the test cup.
(c) Test flame applicator, for applying the test flame, having the tip at the end of about 1.6 mm diameter with an orifice of 0.8 mm diameter. The device swings such that the center of the orifice is not more than 2 mm above the rim of the cup. A bead having a diameter of 3.2 to 4.8 mm is mounted in a convenient position on the apparatus so that the size of the test flame can be controlled by comparison to it. Domestic LPG gas is the smallest cylinder that can be used.
(d) An electric heater controlled by a variable voltage transformer. Flame heater or burner using a gas can also be used.
(e) Thermometer support to hold the thermometer in a specified position.
A shield 460 mm square and 610 mm high and having an open form is recommended,
Thermometers of specifications :
For low range values, measurement range – 7 to 110 degree Celsius and readable to 0.5 degree Celsius.
For high range values, measurement range – 90 to 370 degree Celsius and readable to 2 degree Celsius.
Semi-automatic and automatic Cleveland open cup apparatus are generally used
Procedure
Part 1: Flash Point
1. Clean the test cup with an appropriate solvent to remove any deposits; wash with water and dry over an open flame or hot plate. Allow it to cool.
2. Assemble and support the apparatus.
3. Insert the thermometer of high or low range as per requirement in a vertical position with the bottom of bulb 6.4 mm from the bottom of the test cup. It should be positioned at a point halfway between the center and side of the cup on diameter perpendicular to the arc of the sweep of the test flame and on the side opposite to the test flame’s burner arm. Also insert the stirrer, to stir the material.
4. Heat the bitumen to a temperature not more than 100 degrees Celsius above its approx. softening point until it has acquired pouring consistency. Stir molten material to remove air bubbles and water.
5. Pour the hot bitumen to fill the test cup up to the filling mark. Light the test flame and adjust it.
6. Apply heat initially at the rate so that the temperature rise of the sample is 14 to 17 degrees Celsius per minute. When the sample temperature has reached approximately 56 degrees Celsius below-expected flashpoint, supply heat at such a rate that the temperature increases as recorded by the thermometer are neither less than 5 degrees Celsius not more than 6 degrees Celsius per minute for the last 28 degree Celsius before the flashpoint.
7. Light the test flame and adjust it to a diameter of 3.2 to 4.8 mm.
8. Start application of the test flame when the temperature is at least 28 degrees Celsius below the expected Flashpoint; apply the test flame at 2 degrees Celsius intervals. Pass the test frame across the center of the cup with a smooth continuous motion. Pass the flame in one direction first, then in the opposite direction, the time spent in passing the test flame across the cup should be about one second.
9. When a flash fire appears at any point on the surface of the material in the cup, note the temperature on the thermometer and record it as a flashpoint.
READ MORE
- Aggregate Crushing Value Test
- Water Content of Soil by Oven Drying Method
- Specific Gravity of Cement by Specific Gravity Bottle
- Sp. Gravity & Water Absorption Of Coarse Aggregate
- Sp. Gravity & Water Absorption of Fine Aggregates
Part 2: Fire Point
1. After flashpoint has reached, heating should be continued at a rate of 5 degrees Celsius to 6 degrees Celsius per minute.
2. The test flame should be adjusted so that it is of the size of a bead 4 mm in diameter.
3. Continue application of the test flame at 2 degree Celsius intervals until the vapours ignite and continue to burn for at least 5 seconds. Record the temperature at this point as the fire point.
4. The duplicate result should not differ by more than 8 degree Celsius for both flash point and fire point.
Observation and Calculations
Flash Point = …………………. degree Celsius
Fire Point = ………………….. degree Celsius
Precautions
1. Wear safety glasses and/or face shields, heat resistant gloves with close-fitting cuffs.
2. There shall be no smoking or the presence of other ignition sources in close proximity of test set up.
3. Check the samples for the presence of water while the material is still cold; if the water is present drain off as much water as possible and allow the sample to dry at room temperature or blow dry with clean compressed air.
4. While using a gas burner or other such device for heating the cup, the free flame should not be allowed to come up around the cup.
5. During the last 17 degree Celsius rise in temperature prior to the flashpoint, care must be taken to avoid disturbing the flashpoint; care must be taken to avoid disturbing the vapors in test cup by careless movement or breathing near the cup.
6. The bluish halo that sometimes surrounds the test flame should not be confused into the true flash.
7. Discontinue stirring during the application of the test flame.
Discussion
Flashpoint should be taken as the temperature read on the thermometer at the time when the vapor of bitumen momentarily catches fire. Flash Point information required for safety in handling the bituminous materials. This test can also be conducted to determine the flash and the fire points of fluxed native asphalt, cutback bitumen, and blown type bitumen, etc.


