In this post, we will learn about the Methodology of Post Tensioning Work at the site.
The methodology of Post Tensioning Work
Post – Tensioning work is divided into three major activities. The general methodology is given below.
1. Profiling.
2. Stressing.
3. Grouting.
1) Profiling :
- Read the drawings and identify the type of tendons, layout, locations, number of strands per tendon, the sequence of laying, number of tendons per pour, etc.
- Calculate the materials required such as Tube Units, Bearing Plates, Wedges, Sheathing and Pre-stressing Steel (HTS).
- Calculate the cut length of Strand inclusive of Jack Grip length & profile for each tendon and prepare Strand cutting schedule as per drawing. HT Strand must be cut by using a cut-off wheel/abrasion blade.
- HT Strand shall be uncoiled using coil dispenser and it should not contact soil or dust while cutting.
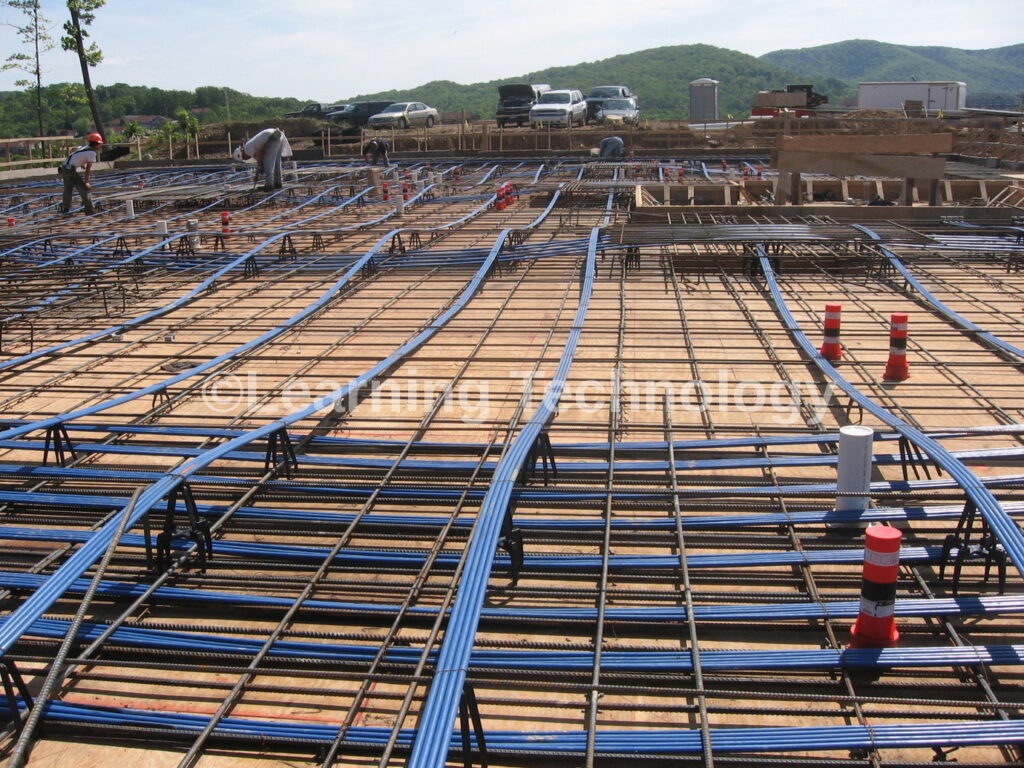
- Mark the Tendons as per Tendon layout drawing after the completion of formwork & reinforcement.
- Fix the fabricated tendon support bars rigidly at every 1 meter (max.) interval according to the tendon layout and profile drawings.
- Lay the sheathing over the tendon support bars as per the tendon layout drawing and join the ducts using couplers and seal the joint using self-adhesive tape.
- STACKING AND STORAGE OF MATERIALS
- Design and Construction Of Pile Foundations
- Evolution of Retaining Structures
- Glossary Relating To Bitumen And Tar
- Aluminium Formwork Refurbishment
- Safety For Hydraulic Tensioning Jacks
- Methodology of Post Tensioning Work
- Properties of Prestressing HT Strand
- Losses in Pre Stress due to Elastic Shortening
- Jack Pressure for Single and Multi Pull Stressing
- Elongation & Modified Elongation in Prestressing
- Prestressing Materials Management at Site
- Prestressing : Definitions | Advantage | Application
- Slipform – Slipform Planning at Site
- Labour Productivity Norms in Slipform
- Dismantling Procedure of Slipform
- Slipform Reinforcement Schedule Planning
- Assembly of Stair Tower for Slipform
- Assembling Procedure of Tapering Slipform
- Assembling Procedure of Straight Slipform
- Classification Of Slip Form Work
- Design Considerations of SlipForm
- Evolution of Slip Form Now a Days
- Measure Horizontal Distance Using AutoLevel
- Bulking OF Fine Aggregates
- Concrete Cube Samples Taken for Different Volume
- Grades of Concrete as per IS 456 : 2000
- Flowchart For Aluform Work At Site
- Dismantling Process of Aluminium Formwork
- Assembling Process of Aluminium Formwork
- Dismantling Of Slab Aluminium Formwork
- Dismantling Of Wall Column & Beam Formwork
- Aluminium Formwork Concreting Process
- Assembling of Wall Aluminium Formworks
- Assembly Process of Aluminium Formwork
- Aluminium Formwork Worksite Management
- What is 1.54 in Concrete
- De Shuttering Period as per IS 456
- Grade Of Concrete And Its Cement, Sand And Aggregate Ratio
- Derivation Of (d²/162) – Unit Weight Of Bar
- Volume Of Different Shapes
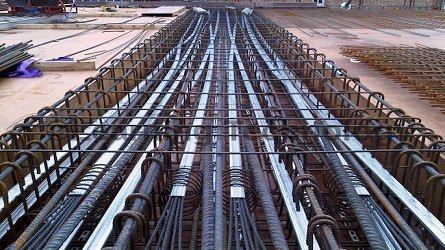
- Thread the required number of Strands into Sheathing according to the Tendon type and tie the sheathing with Bar Chairs using Binding wires rigidly.
- Profiling of Tendons, both horizontally and vertically as per drawings and arresting it rigidly to avoid any disturbances in the profile during concreting.
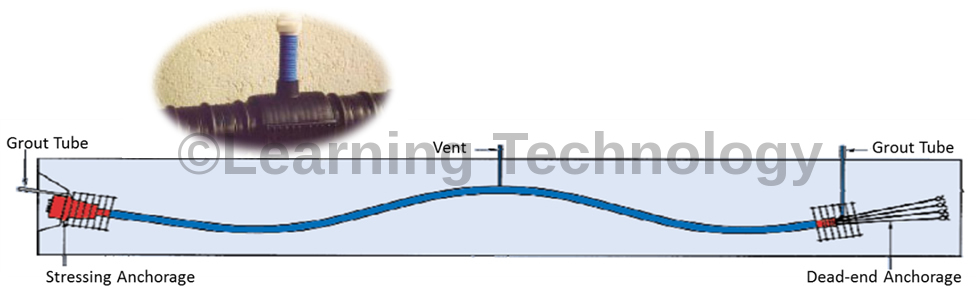
- Fix the Stressing anchorages and make Dead-end anchorages position as per the layout drawing. Fix the Grout vents at end portions and Air vents at high profile locations and seal it properly.
- Tie Bursting and Spiral reinforcements at the anchorages zones as per the details given in drawing.
- Final checking of all Tendons for profiling, supporting and sealing after the completion of reinforcement and formwork works and before concreting.
2) Stressing :

- Stressing shall be carried out only after the concrete has attained the required Compressive Strength and age of concrete as specified in the drawing.
- Check the Stressing equipment and hoses before stressing to ensure proper/smooth functioning.
- HT Strand/Wire/Bars shall be completely cleaned (oil, dust & etc.) for gripping of Jacks. Stressing can be carried out stage by stage if required, as per drawing.
- Calculate the Elongation or Modified Elongation for each tendon as per the physical values in TC.
- Calculate the Jack Pressure for the Design Load including Jack & Anchorage losses.
Click For Civil Engineering Videos
- Stressing shall be carried out only as per the specified sequence. The load shall be applied to the tendons by using calibrated hydraulic pumps and jacks and monitored through calibrated Pressure gauges.
- Fix the bearing plate to the tube unit and lock it by wedges and mark a reference point on Strand to measure elongation. Stressing can be performed in single/multi strokes depend on Jack piston length.
- Fix the Hydraulic Jack (Mono/Multi) at stressing end (Single/Double) and ensure proper seating of jack with bearing plate and also connect the Jack & Pump by hydraulic hosepipes.
- Apply the calculated pressure (load) gradually in an incremental basis on each strand or tendon by using hydraulic Jack and Pump. Apply jack pressure at both ends simultaneously for double-end stressing.
- While applying load check for required elongation & jack pressure during stressing and also note the Jack pressure & Elongation reading at every interval/stage in stressing format.
- Compute the total Jack Pressure applied and the total elongation arrived during stressing.
Click For Civil Engineering Videos
- If elongation reached, but the pressure is not reached apply 5% additional elongation. If pressure reached, but elongation did not reach apply 5% additional pressure.
- After applying the additional pressure/elongation, if the Stressing result is within +/-5%, release the jack pressure slowly and then proceed for next stressing.
- If the stressing result/value is more than +/-5% inform the Design Engineer for further instruction. The same method shall be followed for all other Strands / Tendons.
- 12 hours after the completion of stressing of all tendons, cut the strands leaving 25mm from the face of wedges by using angle grinder.
- After cutting fill the recess pockets (Stressing pocket) in layers using approved materials.
3) Grouting :
- After the setting / curing time of recess pockets, flush the tendons (sheathing) completely by water and then by compressed air.
- Potable water and OPC Cement should be used for the preparation of grout. Suitable admixture (Non-Aluminium / Non-Chloride based) may be added to the grout as per specification.
- Fix the valves at all grout and air vents and also fix the pressure gauge.
- Mix Water followed by Cement of ratio 0.40 in the grouting machine.
- The grout shall be mixed in the mixture for 2-3 minutes and until pumping of the grout.
- Grout should be a colloidal mixture and free from any lumps and it should pass through the sieve.
- Pump the grout into the tendon through grout vent pipe (inlet) and release the air inside the tendon through air vents.
Click For Civil Engineering Videos
- Plug all air vent pipes and also the outlet vent pipe after consistent grout is passed.
- After plugging all the vents pipes tightly, built the pressure of 5kg/cm2 and maintain for one minute. Then close the inlet valve also. The same method shall be followed for all other tendons.
- Grouting should be performed continuously to avoid grout sets. Any breakage occurred during grouting, flush the tendon with water and compressed air and do fresh grouting.
- Clean the vicinity by water after the grouting is completed.
- Cut all vent pipes projecting outside the surface after the grout is set.
I hope you find this information useful. If there is something that I have missed or I do not know, you can comment and tell me which I will try to rectify as soon as possible.
If you have liked this post of mine, then use the social link given below and share it among your friends on social media. Thanks
SHARE THIS POST, IF YOU LIKE IT !!
Padhega India Tab Hi Badhega India | पढ़ेगा इंडिया तब ही बढ़ेगा इंडिया


